Guide to Installing Computer Internal Drives
(SATA Hard Drive and SATA DVD Rewriter/Burner)
Step 6 : Install Computer Internal Drives
(SATA Hard Drive and SATA DVD Rewriter/Burner
When installing these cheap computer internal storage, never use a magnetized screwdriver.
Install SATA Hard Drive:
Wear an anti-static wrist strap and exercise extreme care when installing sensitive electronic components.
Install a hard drive cooler to keep your drive cool prior to installation.
The older IDE has now been displaced by SATA; hence, there is no need to configure them as 'Master' or 'Slave'. Gone are those broad, flat ribbon cables.
The hard drive is the largest primary non-removable storage device in your system.
Always use the screws provided since the incorrect length screws can damage the internals of this cheap computer storage device.
Your hard drive should be installed in the appropriate 3.5 inch drive bay using all 4 screws to firmly secure device and prevent vibration.
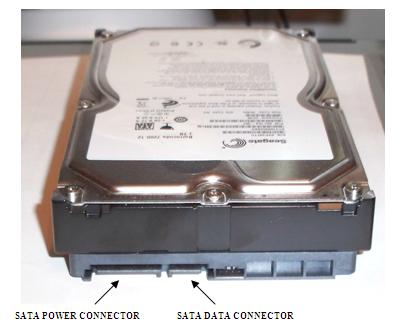
Connect your SATA data and power cables. You're now finished installing the drive. No need for jumpers for configuring 'Master' and 'Slave' like you once did with those IDEs. SATA drives have now reached giant capacities such as 8TB.
Lastly, check to see that cables are secured. Click here to view some cheap computer hard drive coolers.
See diagram below for SATA hard drive.

Image of Seagate 1TB SATA Hard Drive
Check out some fantastic deals on
cheap computer internal drives (hard drives).
Click here to read 'What are Computer Hard Drives?'
Internal Floppy Drive:
For this tutorial, I will omit this computer internal drive. New computers no longer come with this drive. If after completing your build you require one, just purchase an external USB one. They have been ably replaced by the USB flash drive.
Install SATA DVD Rewriter/Burner:
Another computer internal drive is the SATA DVD Rewriter/Burner. This is a multi-format optical drive. It reads, writes and re-writes to CD and DVD media. Its 'big brother', the BluRay drive does all the above plus reading, writing and re-writing to BluRay media.
As mentioned in the hard drive section, these no longer need to be configured with jumpers.
Install your SATA DVD burner in an available 5.25 inch drive bay and properly secure screws on both sides to prevent vibration. Vibration can damage internals.
Note: Follow the same installation procedure as the hard drive to install SATA data and power cables.
For excellent prices on internal SATA DVD burners, click here.
Click here for excellent prices on Internal BluRay burners.
Browse here for all the steps in the
Build Your Own Cheap Computer tutorial
Click Here to go to Step 7: Install Computer Motherboard
in Computer Case
Back / Next
Return from Computer Internal Drives to
Cheap Computer Home Page
Enjoy this page? Please pay it forward. Here's how...
Would you prefer to share this page with others by linking to it?
- Click on the HTML link code below.
- Copy and paste it, adding a note of your own, into your blog, a Web page, forums, a blog comment,
your Facebook account, or anywhere that someone would find this page valuable.

