Guide to Connecting Computer Front Panel Switches
to Motherboard
Step 8: Connect Computer Front Panel Switches/LEDs, Speaker, USB Connectors
This step may seem very simple but to complete your system properly, you need to have these switches, LEDs, speaker and USB ports properly connected.
There are two front panel switches - the power switch and the reset switch.
These switches and LEDs are part of the computer case.
Before doing your connections, consult your computer mainboard manual and examine mainboard to decide where to make these connections.
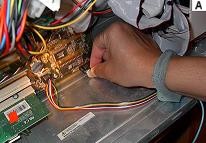
If you connect them backwards, you won't hurt anything but the lights and switches won't work. Simply, reverse the connections if you have this problem. (See Diagram A below).

Installation of front panel switches, LEDs and Speaker.
I hope that you noted the Anti-Static Wrist Band being worn to protect the computer from Static Electricity. Click here to view my article on Static Electricity
Browse Here to view the list of all the steps in the
Build Your Own Cheap Computer tutorial
Click Here to go to Step 9: Connect ATX 20-Pin
Power Supply Connector to Motherboard
Back / Next
Return from Computer Front Panel Switches to
Cheap Computer Homepage
Enjoy this page? Please pay it forward. Here's how...
Would you prefer to share this page with others by linking to it?
- Click on the HTML link code below.
- Copy and paste it, adding a note of your own, into your blog, a Web page, forums, a blog comment,
your Facebook account, or anywhere that someone would find this page valuable.
|

